Garage Gym Safety: Essential Rules for Training Alone
How to train safely in a home gym without a spotter. Safety equipment, technique rules, and emergency protocols every solo lifter needs.
Always train inside a power rack with pin-pipe safeties set 1-2 inches below your lowest rep depth, learn the roll of shame for bench press, keep your phone within reach, and never lift to absolute failure without safeties in place.
Every year, emergency rooms treat thousands of weight-training injuries that happen at home. A 2024 study published in the American Journal of Emergency Medicine found that home gym injuries increased 48% between 2019 and 2023, with the majority occurring during unsupervised barbell training. The convenience of a garage gym is unmatched, but training alone without proper safety infrastructure turns every heavy set into a gamble.
This is not a guide for beginners afraid of barbells. This is a comprehensive safety protocol for serious lifters who train alone — covering the equipment that prevents catastrophic failures, the bail-out techniques that save lives, the programming principles that keep you out of the danger zone, and the emergency protocols that handle worst-case scenarios.
If you are building a home gym from scratch, pair this guide with The Ultimate Beginner's Home Gym Guide and the Garage Gym Flooring Guide to ensure your space is set up correctly from day one.
Why Solo Training Demands Different Safety Standards
Commercial gyms have built-in redundancies: other lifters nearby, staff trained in CPR, and equipment regularly inspected by maintenance crews. Your garage has none of that. When you train alone, you are simultaneously the lifter, the spotter, the safety officer, and the first responder. That means your equipment and your habits must compensate for the absence of a training partner.
The three categories of garage gym risk are:
- Equipment failure — J-cups slipping, bolts loosening, barbells bending under load
- Technique failure — missed lifts, form breakdown under fatigue, unexpected muscle cramps
- Medical emergency — fainting, cardiac events, allergic reactions, heat exhaustion
A proper safety setup addresses all three. Let us walk through each layer of protection.
Essential Safety Equipment for Solo Lifters
Power Rack with Integrated Safety Arms
A power rack with steel safety arms or pin-pipe safeties is the single most important piece of equipment for a solo lifter. Full stop. No squat stand, no open rack, and no smith machine substitutes for a four-post power rack with properly rated safeties.
What to look for in safety arms:
- Weight capacity of 700+ lbs on the safeties themselves (not just the rack's static rating)
- Hole spacing of 2 inches or less in the bench and squat zone — Westside hole spacing (1-inch increments) is ideal for dialing in exact safety heights
- UHMW plastic lining on J-cups and safety bars to protect your barbell knurling
- Pin-pipe safeties over flip-down safeties — pin-pipes are more secure under eccentric loading and cannot accidentally fold
The ULTRA FUEGO Power Cage is an excellent budget rack with solid safety bars and 800 lb capacity, making it a strong foundation for solo training.

ULTRA FUEGO Power Cage, Multi-Functional Power Rack
Capacity
800 lbs
Steel
2x2" 14-Gauge Steel
Footprint
50.5" L x 46.5" W x 83.5" H
Price
$389.98
- 4.5+ star rating on Amazon with 5,000+ reviews
- Excellent value under $350
- 800 lb weight capacity
- Includes multi-grip pull-up bar
- Standard 2x2 hole spacing for attachments
- Optional lat pulldown attachment available
- 14-gauge steel is thinner than premium racks
- Plastic J-cup liners can wear over time
- Not ideal for lifters squatting 600+ lbs
Price and availability may change
For lifters squatting over 400 lbs or doing heavy rack pulls, the Sportsroyals Power Cage offers higher weight capacity and includes a cable crossover system for isolation work.

SPORTSROYALS Power Rack, Multi-Functional Power Cage with Pulley System & LAT Pull Down
Capacity
1,600 lbs
Steel
2x2" Heavy-Duty Steel
Footprint
52" L x 49" W x 84" H
Price
$319.99
- 4.7+ star rating on Amazon
- Massive 1,600 lb weight capacity
- Full adjustable cable crossover system included
- Multiple attachment points (LAT, low row, landmine)
- Comes with complete attachment package
- Best value all-in-one home gym rack
- Large footprint requires dedicated space
- Assembly requires 4-5 hours with two people
- Cable system adjustments take practice
Price and availability may change
Barbell Collars
Always use collars. A loaded barbell without collars is a lever waiting to tip. When plates shift even slightly during a squat walkout or bench unrack, the asymmetric load creates a rotational force that can rip the bar out of your hands. The whip effect when plates slide off one side has shattered garage windows, cracked concrete floors, and broken lifters' feet.

Synergee Aluminum Barbell Collars – 2" Olympic Locking Barbell Clamps with Quick-Release Lever – Secure Weight Clips for Powerlifting, Olympic Lifts & Strength Training
Capacity
Fits all Olympic 2" barbells
Steel
CNC Aluminum / Quick-Release Lever
Footprint
Pocket-sized clips
Price
$22.95
- 4.7+ star rating on Amazon with 5,000+ reviews
- CNC machined aluminum — lightweight and strong
- Quick-release lever locks in under 1 second
- Fits all standard Olympic 2" barbells
- Won't scratch or damage bar sleeves
- Best upgrade from spring clips
- Pricier than basic spring clips
- Slightly loose on some thinner-sleeve bars
- Only comes in 1 size (2" Olympic)
Price and availability may change
The bench press collar debate: Some solo lifters intentionally bench without collars so they can dump plates to one side if pinned. This is a legitimate emergency technique when you have no rack, but it should never be your primary safety strategy. If you bench inside a power rack with correctly set safeties, always use collars.
Lifting Belt for Spinal Safety
A quality leather lifting belt is not just a performance tool — it is an injury prevention device. The belt gives your core muscles something to brace against during heavy squats, deadlifts, and overhead presses, increasing intra-abdominal pressure by up to 40%. This stabilizes the lumbar spine under heavy load and reduces the risk of disc injuries.
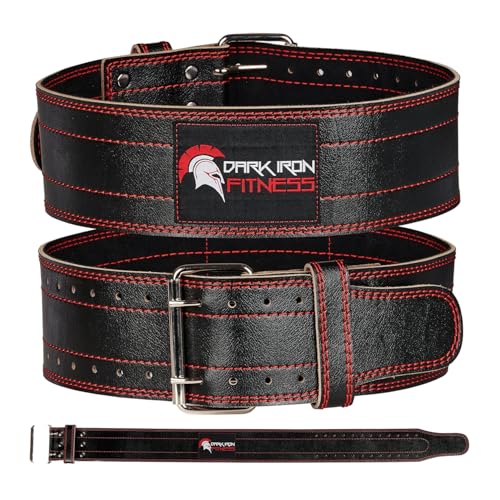
Dark Iron Fitness Genuine Leather Weightlifting Belt, 4 Inch Wide with Double Prong Buckle
Capacity
Suitable for any lifting weight
Steel
Genuine Leather / Reinforced Stitching
Footprint
4" wide leather belt with double prong buckle
Price
$59.99
- 4.6+ star rating on Amazon with 12,000+ reviews
- Genuine buffalo leather (not bonded leather)
- 5-inch wide consistent thickness
- Lifetime replacement guarantee
- Steel buckle (not flimsy plastic or cheap velcro)
- Best leather lifting belt under $100
- Stiff out of the box — needs break-in period
- Single-prong design (some prefer double-prong)
- Sizing runs small — order up one size
- Leather smell takes a week to fade
Price and availability may change
When to belt up: Use a belt for working sets at 80% of your one-rep max and above. Do not wear a belt for every set — training beltless at lighter weights strengthens the core muscles that protect your spine during daily life.
Rubber Flooring
Proper flooring is a safety feature, not an aesthetic choice. Rubber flooring provides three critical protections: grip (preventing slips from sweat or chalk), impact absorption (protecting your concrete slab and equipment during dropped barbells), and noise dampening (so a failed deadlift at 6 AM does not crack your garage floor). Read the full Garage Gym Flooring Guide for detailed material comparisons and installation instructions.
- Power rack safeties catch failed squats and bench presses without a spotter
- Barbell collars prevent asymmetric loading and dangerous plate shifts
- Lifting belts increase intra-abdominal pressure by up to 40% for spinal protection
- Rubber flooring prevents slips and absorbs impact from dropped weights
- Pin-pipe safeties are more secure than flip-down or strap safeties under heavy loads
- UHMW-lined J-cups grip the bar during racking and protect knurling
- Quality safety equipment adds $200-600 to initial gym investment
- Pin-pipe safeties require 5-10 seconds to adjust height between exercises
- Heavy-duty racks require permanent floor space (minimum 4x4 feet footprint)
- Rubber flooring emits strong odor for 2-4 weeks after installation
- Safety arms create a false sense of security if set at incorrect heights
- Belt dependency can develop if overused at lighter training weights
Bail-Out Techniques Every Solo Lifter Must Practice
Safety equipment is your last line of defense. Knowing how to bail from a failed lift is the skill that bridges the gap between a missed rep and an injury. Practice every technique listed below with an empty barbell before you need it under load.
How to Bail a Failed Squat
The squat is the most dangerous lift to fail without preparation. A loaded bar on your back with nowhere to go can cause spinal compression injuries, torn ligaments, or worse. Here is the hierarchy of squat bail techniques:
Option 1 — Sit into the safeties (preferred). As soon as you recognize you cannot complete the rep, stop driving upward. Keep your core braced and slowly lower your hips until the barbell rests on the safety arms. Once the bar is supported, duck forward out from under it. This is the safest bail because the weight transfers gradually and the bar stays controlled.
Option 2 — Dump the bar backward. If you are squatting outside a rack (which you should not be doing alone), push the bar backward off your shoulders while stepping forward. This only works safely with bumper plates on rubber flooring. Iron plates on concrete will bounce unpredictably.
Option 3 — Controlled collapse. In a worst-case scenario where you lose balance, drop to your knees and let the safeties catch the bar above you. This is traumatic but survivable — far better than fighting a weight you cannot control.
Setting the correct safety height for squats: Unload the bar. Squat to your maximum depth. Have the safeties set 1 inch below the bar at that bottom position. The bar should clear the safeties during normal reps but catch immediately if you sink even slightly lower than usual.
How to Bail a Failed Bench Press
The bench press is statistically the most dangerous barbell lift performed alone. A loaded bar pinned across the chest or throat can be fatal within minutes. Never bench press heavy without at least one of these safety measures in place.
Option 1 — Rack safeties (best). Set the safety arms or pins at a height that is approximately half an inch above your chest when your back is arched. When you fail, flatten your arch and lower the bar. The safeties catch it before it compresses your ribcage. You then slide out from under the bar on the bench.
Option 2 — The Roll of Shame. If you fail without a rack, lower the bar to your lower chest. Roll it down your torso toward your hips — this is uncomfortable but not dangerous because the bar rolls over your abdominal muscles, not your ribcage. Once the bar reaches your hip crease, sit up with the bar resting on your thighs, then stand or tip it to the floor.
Option 3 — Dump the plates. Without collars, tilt the bar to one side so the plates slide off. The bar will then violently whip to the opposite side as those plates fall. This is a last resort that can damage equipment, flooring, and your walls.
How to Handle a Failed Overhead Press
The overhead press is relatively safe to bail because the bar is in front of your body. If you cannot lock out a rep, simply guide the bar back down to your shoulders, then to your chest, and set it in the rack. If the bar gets stuck behind your head (rare but possible with push presses), step forward and let it fall behind you.
Deadlift Safety
Deadlifts are inherently self-spotting — gravity is pulling the bar toward the floor, and you can release your grip at any point. The main deadlift danger is lower back injury from rounded-spine pulling, not a failed bail. Focus on maintaining a neutral spine, and drop the bar immediately if you feel your lower back rounding under load.
Programming Principles for Safe Solo Training
Rate of Perceived Exertion (RPE) for Solo Lifters
RPE is the solo lifter's best friend. Instead of chasing percentages based on a one-rep max you tested months ago, RPE accounts for daily fluctuations in strength, sleep quality, nutrition, and stress.
| RPE | Reps in Reserve | Solo Training Use |
|---|---|---|
| 6 | 4+ reps left | Warm-up sets, technique work |
| 7 | 3 reps left | Light working sets, volume days |
| 8 | 2 reps left | Standard working sets — your bread and butter |
| 9 | 1 rep left | Heavy singles and doubles with safeties set |
| 10 | Max effort | Never train to RPE 10 alone on squat or bench |
The solo lifter's rule: Keep your working sets between RPE 7 and RPE 8.5 on squat and bench press. This range produces 90%+ of the strength and hypertrophy stimulus of training to failure while maintaining a margin of safety that prevents catastrophic misses.
Autoregulation: Adjusting on the Fly
Some days you walk into the garage and the bar feels like it is filled with helium. Other days, your warm-up weight feels like your max. Autoregulation means adjusting your training load based on how the bar is actually moving, not what your spreadsheet says you should lift.
Practical autoregulation protocol:
- Perform your warm-up sets as programmed
- On your first working set, assess the RPE honestly
- If RPE is 1-2 points higher than expected, reduce the weight by 5-10%
- If RPE is lower than expected, you may add 5 lbs — but never exceed RPE 9 alone
- Track actual RPE alongside programmed RPE to identify fatigue patterns over time
Exercises to Avoid When Training Alone
Certain exercises carry disproportionate risk for solo lifters and should be replaced with safer alternatives:
| High-Risk Exercise | Safer Solo Alternative |
|---|---|
| Heavy barbell skull crushers | Cable or dumbbell overhead tricep extensions |
| Behind-the-neck press | Standard overhead press or Z-press |
| Barbell hip thrusts (very heavy) | Bulgarian split squats, Romanian deadlifts |
| Maximal box squats | Regular squats with safeties |
| Heavy good mornings | Romanian deadlifts, back extensions |
Pre-Session Safety Checklist
Run through this checklist before every training session. It takes 60 seconds and can prevent every common garage gym accident.
Equipment Checklist
11 itemsMonthly and Quarterly Equipment Inspections
Daily visual checks catch obvious problems. Monthly deep inspections catch the ones that build up gradually and fail suddenly.
Monthly Inspection Protocol
- Rack hardware: Use a socket wrench to tighten every bolt on the rack frame, J-cups, safety arms, and any attachments. Vibration from daily training loosens hardware over time. A loose bolt on a J-cup can allow it to tilt when you rack 300+ lbs.
- Barbell condition: Roll the bar on a flat surface to check for bends. Spin each sleeve and listen for grinding (indicates bearing or bushing wear). Inspect the knurling for unusual wear patterns that could indicate a structural weak point.
- Cable and pulley systems: If your rack has a cable attachment, inspect every cable for fraying. A single frayed strand means the cable needs immediate replacement. Check pulley wheels for cracks and ensure they spin freely.
- Plate inspection: Look for hairline cracks in cast iron plates, especially around the hub. Cracked plates can shatter under impact. Check bumper plates for chunks or delamination.
Quarterly Deep Maintenance
- Wipe down all steel surfaces with a light coat of 3-in-1 oil to prevent rust, especially in humid or unheated garages
- Inspect rubber flooring for tears, compression damage, or separation between mats
- Test smoke detector and CO detector in the garage (essential if you heat with propane or gas)
- Verify first aid kit contents — replace used items, check medication expiration dates
For a detailed barbell care protocol, see the Barbell Maintenance Guide.
Emergency Protocols for Solo Lifters
Before You Train: The Buddy System
Before every session, tell someone — a partner, roommate, family member, or friend — three things:
- Where you are training (garage, basement, shed)
- When you started and approximately how long you will be
- What to do if you do not check in by a specific time
Set a recurring alarm on your phone. When the session ends, text your contact. If they do not hear from you within 30 minutes of the expected end time, they should call you. If you do not answer, they check on you in person or call 911 with your address.
This is not paranoia. A 245 lb barbell on your chest blocks breathing. Unconsciousness from oxygen deprivation can occur within 3-4 minutes. Brain damage begins at 5-6 minutes. Having someone who expects to hear from you is the difference between a scary story and a funeral.
In-Gym Emergency Kit
Keep the following within arm's reach of your lifting platform — not across the garage, not on a shelf, not in a bag. Within reach.
- Charged phone — know your exact street address by heart (panic erases memory)
- Basic first aid kit — bandages, gauze, antiseptic, medical tape, instant cold pack
- Emergency whistle — louder than screaming and requires less energy if you are pinned
- Flashlight — power outages in garages happen, and navigating around loaded barbells in the dark is dangerous
- Water — dehydration is a leading cause of exercise-related fainting
What to Do If You Get Pinned
If you are trapped under a barbell despite all precautions:
- Do not panic. Controlled breathing preserves energy and oxygen.
- Assess the situation. Can you roll the bar? Can you reach your phone? Can you dump plates?
- Call for help immediately. Yell, use a whistle, or call 911 if you can reach your phone.
- Protect your airway. If the bar is on your chest, turn your head to the side and focus on breathing. Do not try to bench press the bar off — if you already failed the rep, panic-strength is unlikely to save you.
- Wait for help. If you followed the buddy system protocol, someone will check on you.
Environmental Safety: Temperature, Ventilation, and Lighting
Your garage is not a climate-controlled commercial gym. Environmental factors cause more subtle but equally dangerous safety issues.
Heat Safety
Garage temperatures in summer can exceed 120\u00b0F in southern states. Training in extreme heat without precautions leads to heat exhaustion (dizziness, nausea, confusion) or heat stroke (a life-threatening medical emergency). Open the garage door, use fans, and drink 16-20 oz of water per hour of training. If your body temperature rises to the point where you stop sweating, stop training immediately and cool down. Read the Summer Cooling Guide for detailed heat management strategies.
Cold Safety
Training in a 30\u00b0F garage creates its own risks. Cold muscles are injury-prone muscles. Extend your warm-up by 10-15 minutes, keep your torso covered between sets, and never grip a frozen steel barbell with bare hands — the thermal conductivity of steel can cause frostnip in seconds. Knurled barbells in freezing temperatures shred already-dry skin.
Ventilation and Air Quality
A sealed garage traps carbon dioxide from your breathing, rubber off-gassing from flooring, and potentially carbon monoxide from attached garages or nearby vehicles. Install a CO detector. Open the garage door or a window for airflow during training. If your gym is in a basement, a basic exhaust fan prevents CO2 buildup during high-intensity conditioning work.
Lighting
Shadows in the squat rack are dangerous. If you cannot clearly see the J-cup hooks when racking from a set of heavy squats, you risk missing the hooks entirely. Install 5000K daylight LED shop lights directly above and slightly in front of your rack. Two 4-foot LED fixtures (around $25 each) provide more than enough illumination.
Common Garage Gym Injuries and How to Prevent Them
| Injury | Root Cause | Prevention Protocol |
|---|---|---|
| Barbell dropped on foot | Loading plates without securing the bar | Always load plates with the bar resting on J-cups, never from the floor |
| Crushed under failed squat | No safeties, too heavy | Power rack with pin-pipe safeties set 1 inch below max depth |
| Pinned under bench press | No rack, no spotter, ego loading | Always bench inside a rack with safeties set at chest height |
| Lower back strain or disc herniation | Rounded spine under load, fatigue | Belt for heavy sets, RPE-based training, stop at first sign of form breakdown |
| Knee ligament injury | Cold muscles, sudden direction change | 10-15 minute warm-up, avoid plyometrics in cold garages |
| Shoulder impingement | Behind-the-neck pressing, poor mobility | Neutral grip pressing, daily shoulder mobility work, avoid high-risk exercises |
| Slipped and fell | Sweat or chalk on smooth concrete | Rubber flooring, clean surface between sessions, chalk only on hands |
| Barbell whip or spin | Uneven plate loading, no collars | Always use collars, load plates evenly on both sides simultaneously |
| Carbon monoxide exposure | Poor ventilation in attached garage | CO detector, open garage door during training, never run vehicles nearby |
| Heat stroke | Training in 100\u00b0F+ garage without cooling | Fans, hydration, temperature monitoring, stop if dizzy or nauseated |
Frequently Asked Questions
Is it safe to squat heavy without a spotter in a home gym?
What is the Roll of Shame and when should I use it?
Should I use barbell collars when bench pressing alone?
How often should I inspect my power rack and gym equipment?
What RPE should I train at when lifting alone?
What temperature is too hot or too cold to train in a garage gym?
What should I do if I get injured while training alone in my garage?
Do I need a lifting belt for safety when training alone?
Additional Resources
The Solo Lifter's Safety Mindset
The most dangerous piece of equipment in your garage gym is your ego. Every catastrophic home gym injury shares the same root cause: a lifter attempted something beyond their current ability without adequate safety measures. The barbell does not care about your PR from six months ago, your strength before your layoff, or what your program says you should be lifting today.
Train with the weight that is in front of you, not the weight that should be. Set your safeties every session. Practice your bail-outs regularly. Tell someone when you are training. Inspect your equipment. Stay hydrated. Monitor the temperature.
These habits are not optional additions to your training — they are the foundation that allows you to train alone, consistently, for decades without a single preventable injury. The strongest lifters are the ones who are still lifting at 60 because they respected the process at 30.
Related Content
- Garage Gym Lighting Guide: Best Lights for Training (2026)
- Training in a Cold Garage Gym: Winter Survival Guide
- How to Buy Used Gym Equipment (Without Getting Ripped Off)
- Garage Gym Electrical & Power Setup Guide (2026)
- The Complete Guide to Garage Gym Flooring (2026)
- Home Gym Insurance & Liability: What Lifters Need to Know
- The Ultimate Beginner's Home Gym Guide
- Home Gym for Kids & Teens: Safe Training Equipment Guide
- Barbell Maintenance Guide
- Garage Gym Summer Cooling Guide
- All Safety & Solo Training Content
Marcus Reid
Powerlifter and mechanical engineer who has been building and breaking home gym equipment for 15 years.
Read full bioMore in Guides
Strength vs Hypertrophy: How to Program for Your Goals (2026)
The definitive guide to programming for strength vs size in your home gym. Rep ranges, volume, intensity, and complete programs for both goals.
The Complete Home Gym Warm-Up Guide (2026)
Stop skipping your warm-up. Complete warm-up protocols for every training style, plus the equipment that makes preparation effortless at home.
Home Gym Deload Guide: When and How to Back Off (2026)
Learn when and how to deload in your home gym. Science-backed protocols, recovery strategies, and signs you need a rest week.