Home Gym for Back Pain Sufferers: Train Without Hurting (2026)
How to train safely with chronic or recurring back pain. Equipment, exercises, and programming for lifters with back issues.
If you have chronic or recurring back pain, you have probably heard the advice to "just rest" or "take it easy." That advice is outdated and counterproductive. Over four decades of clinical research, including large-scale meta-analyses published in journals like The Lancet and JAMA, demonstrate that structured strength training is one of the single most effective interventions for non-specific low back pain. It outperforms medication, injections, passive therapies, and prolonged rest by virtually every measure: pain reduction, functional improvement, and recurrence prevention.
A home gym gives you the ideal environment to do this work. You control the equipment, the pace, the schedule, and the intensity. There is no waiting for machines, no awkward explanations, and no pressure to push through a flare-up because your gym membership is expiring. You train when your back cooperates, and you rest when it does not.
This guide covers exactly how to build a back-friendly home gym, which exercises to prioritize and avoid, programming strategies backed by spinal biomechanics research, and a complete sample training plan you can start this week.
Important Medical Disclaimer
This guide is general educational information and is not a substitute for medical advice. You should get a proper diagnosis from a physician or physical therapist before starting any training program. Specific spinal conditions such as acute disc herniation, spinal stenosis, spondylolisthesis, or cauda equina syndrome require individualized clinical approaches that no general guide can replace. If you experience radiating leg pain, numbness, tingling, or loss of bowel/bladder control, seek immediate medical attention.
Why Strength Training Is the Gold Standard for Back Pain
The evidence base is overwhelming. Here is what the research consistently shows:
- Muscular support reduces spinal loading -- A weak posterior chain (glutes, hamstrings, erector spinae) forces your vertebrae, discs, and ligaments to absorb forces that muscles should handle. Strengthening these structures offloads the spine and reduces pain.
- Movement reduces systemic inflammation -- Sedentary behavior increases inflammatory markers (IL-6, TNF-alpha) that sensitize pain receptors. Regular exercise reverses this process within weeks.
- Strength training cuts recurrence by 50% or more -- A 2015 systematic review in British Journal of Sports Medicine found that strength training reduced injury recurrence rates by 50-70% across multiple studies.
- Core endurance (not core strength) predicts back health -- Dr. Stuart McGill's research at the University of Waterloo demonstrates that spinal stability depends on muscular endurance, not peak force. Training accordingly changes outcomes dramatically.
- Improved proprioception and motor control -- Targeted exercises retrain your neuromuscular system to stabilize the spine during movement, reducing the "guarding" patterns that cause secondary pain.
- Psychological benefits reduce pain perception -- Exercise improves mood, reduces catastrophizing, and increases self-efficacy. These psychological factors are among the strongest predictors of chronic back pain outcomes.
The wrong approach (complete rest, training through sharp pain, or avoiding movement entirely) makes back pain worse. The right approach (progressive, intelligent, pain-aware training) is the best treatment modern science has to offer.
The Home Gym Advantage for Back Pain Sufferers
Training at home is not just convenient for people with back issues. It is genuinely superior to a commercial gym for several specific reasons:
- Micro-progression is possible. You own the fractional plates, the specific bands, and the exact dumbbell increments you need. Commercial gyms rarely stock 1.25 lb plates or the exact band resistance your rehab requires.
- No time pressure. You can rest 5 minutes between sets during a flare-up without someone asking to "work in."
- Immediate access to heat and ice. Heating pad before training, ice pack after. This pre-hab/post-hab loop is impossible at a commercial gym.
- Equipment chosen for your spine. Every piece in your gym exists because it serves your back. No Smith machines with forced bar paths. No fixed-position machines designed for average anthropometry.
- Consistency beats intensity. You are far more likely to do three 30-minute sessions per week when the gym is 15 steps away. And consistency is the single biggest variable in back pain improvement.
For a broader look at building a gym around physical limitations, see our Home Gym for Injury Rehab and Recovery guide.
Essential Equipment for a Back-Friendly Home Gym
1. Trap Bar (Hex Bar) -- The Most Important Purchase

Bells of Steel Trap Bar, Open Ended Hex Bar with Rotating Sleeves & Built-in Jack
Capacity
700 lbs
Steel
Heavy-Duty Steel / Rotating Sleeves
Footprint
Open-ended design, Olympic sleeves
Price
$299.99
- Open-ended design allows easier plate loading
- Rotating Olympic sleeves for smoother lifts
- Built-in barbell jack saves your back
- Dual handle heights for high or low pulls
- 700 lb weight capacity
- Great for deadlifts, shrugs, and farmer walks
- Pricier than basic hex bars
- Open ends require more space awareness
- Heavy unit at ~55 lbs unloaded
Price and availability may change
If you buy one piece of equipment for back pain training, make it a trap bar. The biomechanics are unambiguous: a 2011 study in the Journal of Strength and Conditioning Research (Swinton et al., 2011) found that trap bar deadlifts reduce peak lumbar moment by approximately 8-10% compared to conventional barbell deadlifts while producing equivalent hip and knee extension torques. In practical terms, you get the same lower body and posterior chain stimulus with significantly less shear force on your lumbar spine.
The Bells of Steel Trap Bar features dual raised and low handles, allowing you to start from a higher position (less spinal flexion) during flare-ups and progress to the low handles as your back tolerates more range of motion. At under $120, it is the best value trap bar for home gym use. Read our Bells of Steel Trap Bar review for full specs and loading capacity details.
Why it works for bad backs:
- More upright torso position reduces anterior shear on lumbar discs
- Centered load (you stand inside the bar) eliminates the forward lean required by a straight bar
- High handles reduce starting hip angle, decreasing demand on the erector spinae
- Easier to learn correct form -- most people can trap bar deadlift safely within one session
2. Adjustable Dumbbells with Fine Increments

BowFlex Results Series SelectTech Dumbbells
Capacity
5-52.5 lbs each
Steel
Steel Plates / Nylon Dial Mechanism
Footprint
16.9" L x 8.3" W x 9" H each
Price
$429.00
- 4.7+ star rating on Amazon with 15,000+ reviews
- Replaces 15 sets of dumbbells (5-52.5 lbs)
- Fastest weight change system on the market (2 seconds)
- 2.5 lb increments up to 25 lbs
- Compact cradle storage footprint
- Sold as a pair
- Cannot be dropped — internal mechanism is fragile
- Length at 52.5 lbs feels awkward on some exercises
- Price has increased from original $349 MSRP
- 5 lb increments above 25 lbs
Price and availability may change
Dumbbells unlock unilateral (single-arm, single-leg) training, which is critical for back pain sufferers. Unilateral exercises reduce absolute spinal loading compared to bilateral barbell movements, while simultaneously training the stabilizer muscles that protect your spine during daily activities.
The Bowflex SelectTech 552 adjustable dumbbells offer 2.5 lb increments from 5 to 25 lbs, then 5 lb jumps up to 52.5 lbs. That fine-grained progression is essential during rehab phases when jumping from 15 to 20 lbs might be too aggressive. One pair replaces 15 sets of fixed dumbbells, saving significant floor space. Read our Bowflex SelectTech 552 review for a detailed breakdown.
3. Resistance Bands

Bodylastics PRO Series Resistance Band Set (6 Bands, 280 lbs)
Capacity
6 bands stackable to 280 lbs
Steel
Anti-Snap Natural Latex Tubing
Footprint
Handles, ankle straps, door anchor + carry bag
Price
$61.97
- 4.6 star rating on Amazon with 2,600+ reviews
- Patented anti-snap inner cord for safety
- 6 bands stackable up to 280 lbs total resistance
- Includes handles, ankle straps, and door anchor
- Lifetime replacement on bands
- Travel-friendly storage bag
- Resistance feels different than free weights
- Door anchor requires an inward-opening door
- Handles wear faster than the bands
Price and availability may change
Bands provide accommodating resistance, meaning the load is lightest at the bottom of the movement (where your back is most vulnerable) and heaviest at the top (where your joints are in a stronger position). This resistance profile is inherently back-friendly.
Bodylastics stackable resistance bands let you combine multiple bands on a single handle for precise resistance levels from 3 lbs to 96+ lbs. They are indispensable for banded pull-throughs, Pallof presses, face pulls, and dozens of back-safe exercises. Read our Bodylastics review.
4. Adjustable Bench with Multiple Angles

FLYBIRD WB2 Weight Bench, Utility Adjustable Weight Bench
Capacity
800 lbs (ASTM Certified)
Steel
Commercial-Grade Steel Frame
Footprint
48.4" L x 16.5" W x 17" H (folded)
Price
$109.99
- 4.6+ star rating on Amazon with 25,000+ reviews
- Unbeatable value under $120
- ASTM-certified 800 lb weight capacity
- 8 backrest angles (90° to -30° FID)
- Folds flat for easy storage in small spaces
- Quick 10-minute assembly
- Gap between seat and backrest at steep inclines
- No decline position on some variants
- Pad is narrower (10.2") than premium benches (12")
- Feet can slide on smooth concrete without rubber mats
Price and availability may change
A bench with 6-8 angle adjustments lets you find positions that do not aggravate your back. Incline pressing at 30-45 degrees often feels dramatically better than flat pressing for people with lumbar issues, because it shifts the force vector away from the lower back. The FLYBIRD Adjustable Bench offers eight backrest angles, folds for storage, and handles 800 lbs. Read our FLYBIRD review.
5. Foam Roller for Daily Soft Tissue Maintenance

TriggerPoint Grid 1.0 Foam Roller - 13" Multi-Density Massage Roller for Deep Tissue & Muscle Recovery - Relieves Tight, Sore Muscles & Kinks, Improves Mobility & Circulation - Targets Key Body Parts
Capacity
500 lbs
Steel
EVA Foam / Rigid Hollow Core
Footprint
13" x 5.5" diameter
Price
$32.92
- 4.7+ star rating on Amazon with 20,000+ reviews
- Multi-density GRID surface targets muscles differently
- Rigid hollow core won't flatten over time
- 500 lb weight capacity — built to last
- Compact 13" size for travel
- The gold standard in foam rollers
- Pricier than basic smooth rollers
- 13 inches too short for full-back rolling
- Firm surface may be intense for beginners
Price and availability may change
Daily thoracic spine mobilization on a foam roller is one of the simplest interventions for back pain. A stiff thoracic spine forces the lumbar spine to compensate with excessive flexion and rotation, which is a primary driver of disc-related pain. Spending 5 minutes per day rolling the upper back can meaningfully reduce lower back symptoms.
The TriggerPoint Grid 1.0 Foam Roller features a patented multi-density surface that targets trigger points and tight muscles more effectively than flat foam. At around $35, it is one of the cheapest pieces of equipment on this list and possibly the most impactful.
6. Roman Chair / Hyperextension Bench (Advanced)
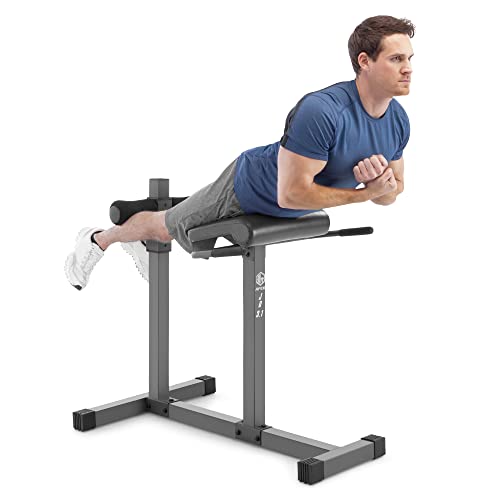
Marcy Adjustable Hyperextension Roman Chair / Hyper Bench JD-3.1
Capacity
300 lbs user weight
Steel
2x2" Steel Tubing / High-Density Foam
Footprint
43" L x 27.5" W x 37.5" H
Price
$99.50
- 4.4 star rating on Amazon with 3,300+ reviews
- Dedicated 45° hyperextension station for lower back, glutes, and hamstrings
- Adjustable foam leg holders and height settings
- Heavy-duty powder-coated steel frame won't sway under load
- Compact single-station footprint for home gyms
- Padded handles and high-density foam roller pads
- Single-function — hyperextensions and back work only
- Foam pads compress over years of heavy use
- Does not fold flat for storage
- Assembly required out of the box
Price and availability may change
Once you have built a baseline of core endurance and pain-free movement (typically 8-12 weeks into training), a Roman chair lets you directly strengthen the erector spinae through controlled back extensions. This is the only piece of equipment specifically designed to build lower back muscular endurance, which Dr. McGill identifies as the primary deficit in chronic back pain populations. The Marcy Hyperextension Roman Chair has a 300 lb capacity and an adjustable footplate.
Important: Do not use a Roman chair during acute flare-ups or before completing the McGill Big 3 progression described below.
Back-Friendly Home Gym Checklist
8 itemsTotal investment: $870-1,000 -- less than 6-8 months of physical therapy copays or a single epidural injection.
Trap Bar Deadlift vs. Conventional Deadlift for Back Pain
This comparison matters enough to address in detail, because the deadlift pattern is the single most important movement for building a resilient back.
- Trap bar reduces peak lumbar moment by 8-10% versus conventional barbell
- More upright torso position decreases anterior disc compression
- High handles allow reduced range of motion during flare-ups
- Centered load eliminates the barbell's tendency to drift forward
- Easier to learn correct form with less coaching required
- Equivalent quadricep and glute activation to conventional deadlift
- Lower perceived exertion at the same absolute load
- Trap bars cost $100-150 and take up storage space
- Less sport-specific if you compete in powerlifting
- Cannot perform traditional barbell rows or Olympic lifts with a trap bar
- High-handle position may feel too easy for advanced lifters
- Grip width is fixed by the handle design
- Some very cheap trap bars have low weight capacity limits
For back pain sufferers, the trap bar wins decisively. Save the straight bar for when you have been pain-free for 3+ months and want to reintroduce conventional pulling.
Exercises to Prioritize
Trap Bar Deadlift
The foundational movement of your program. Start with the high handles and a weight you could lift for 15 reps, but only perform sets of 6-8. This creates a significant strength reserve that protects your back from form breakdown. Progress by adding 5 lbs per week. Once high-handle deadlifts feel easy and pain-free for 4+ weeks, transition to the low handles.
Key form cues: Brace your core as if someone is about to punch your stomach. Push the floor away with your feet rather than pulling the bar up. Maintain a neutral spine throughout -- no rounding, no hyperextension.
Goblet Squat
Hold a dumbbell vertically at your chest with both hands. This loading position forces an upright torso and activates your anterior core, making it nearly impossible to round your lower back. Most people who cannot tolerate back squats find goblet squats completely pain-free. Start with 15-25 lbs and progress to 50+ lbs over several months.
Supported Single-Arm Dumbbell Row
Place one knee and one hand on your bench, rowing the dumbbell with the opposite arm. This three-point support position takes virtually all compressive load off the lumbar spine while still training the lats, rhomboids, and rear deltoids. It is the safest heavy pulling exercise for back pain.
Band Pull-Through
Anchor a resistance band low behind you, face away, and hinge at the hips to pull the band through your legs. This movement trains the hip hinge pattern (the same pattern as a deadlift) without any spinal loading whatsoever. It is an excellent warm-up before trap bar deadlifts and a standalone exercise on lighter days.
Pallof Press (Anti-Rotation)
Anchor a band at chest height and press it straight out in front of you, resisting the rotation force. This trains oblique and transverse abdominis function without any spinal flexion or rotation. Three sets of 10 per side, performed daily, will build the rotational stability that protects your spine during everyday activities like carrying groceries or picking up children.
Glute Bridge and Hip Thrust
Weak glutes are one of the most common findings in chronic low back pain populations. When your glutes do not fire properly, your lumbar erectors compensate, leading to overload and pain. Glute bridges (bodyweight, then weighted) directly address this deficit. Progress from double-leg bridges to single-leg bridges to barbell hip thrusts over 8-12 weeks.
Bird Dog
From a hands-and-knees position, extend opposite arm and leg while maintaining a perfectly stable spine. Dr. McGill's EMG research shows this exercise produces high activation of the multifidus (the deep spinal stabilizer) with minimal compressive load. Do 10 reps per side with a 5-second hold at the top.
Dead Bug
Lie on your back with arms extended toward the ceiling and knees bent at 90 degrees. Lower opposite arm and leg toward the floor while pressing your lower back into the ground. This exercise trains anterior core function and teaches your nervous system to maintain a neutral spine under load. It is the safest core exercise for acute back pain.
Exercises to Avoid Initially
These movements can aggravate most types of back pain. Remove them from your program until you have been symptom-free for at least 6 weeks, then reintroduce one at a time with conservative loading:
- Conventional barbell deadlift -- high anterior shear force on lumbar discs, requires significant hip mobility
- Heavy back squats -- high axial spinal compression, bar position creates forward lean
- Sit-ups and crunches -- repeated lumbar flexion under load compresses discs, particularly problematic for disc herniations
- Russian twists -- combines flexion and rotation, the highest-risk loading pattern for lumbar discs
- Bent-over barbell rows -- sustained isometric lumbar loading in a flexed position
- Heavy standing overhead press -- high compressive force through the entire spine
- Good mornings -- extreme demand on erectors in a mechanically disadvantaged position
- Leg press (deep range) -- forces posterior pelvic tilt at the bottom, flexing the lumbar spine under heavy load
This list is not permanent. Every one of these exercises can be safely reintroduced once your back is strong and resilient. The goal is strategic patience, not permanent avoidance.
The McGill Big 3: Your Daily Non-Negotiable
Dr. Stuart McGill, professor emeritus of spine biomechanics at the University of Waterloo and author of Back Mechanic and Ultimate Back Fitness and Performance, has spent 30+ years researching spinal loading and rehabilitation. His "Big 3" exercises form the foundation of virtually every evidence-based back rehabilitation program in the world.
Do these every single day, including rest days. They take less than 10 minutes.
1. Modified Curl-Up
Lie on your back with one knee bent and one leg straight. Place your hands under the small of your back to maintain the natural lumbar curve. Lift only your head and shoulders off the floor -- do not flex your lumbar spine. Hold for 10 seconds per rep. This trains the rectus abdominis without the disc-compressing flexion of a traditional crunch.
Prescription: 3 sets of descending reps (e.g., 8-6-4) with 10-second holds.
2. Side Plank
Lie on your side, propped on your elbow, with your body in a straight line. Hold this position. For beginners, bend the knees for a shorter lever arm. For advanced trainees, lift the top leg. This exercise trains the quadratus lumborum and obliques, which provide lateral stability to the spine.
Prescription: 3 sets of descending holds (e.g., 30s-20s-10s) per side.
3. Bird Dog
As described above. The key distinction in McGill's protocol is the emphasis on a perfectly locked spine -- zero movement in the lumbar region while the limbs move. Use a dowel rod or broomstick along your spine during practice to ensure you are not compensating.
Prescription: 3 sets of descending reps (e.g., 8-6-4) per side with 10-second holds.
Why descending reps? McGill's research shows that muscular endurance deteriorates within a set, increasing the risk of form breakdown. Descending rep schemes maintain quality throughout the entire session.
Sample 12-Week Training Program
This program is designed for someone with chronic non-specific low back pain who has been cleared for exercise by a medical professional. It uses a phased approach that matches real-world back pain recovery timelines.
Phase 1: Foundation (Weeks 1-4)
Goal: Build core endurance, establish hip hinge pattern, restore movement confidence.
Schedule: 3 days per week, 30-35 minutes per session.
Daily (every day including rest days):
- McGill Big 3: Modified curl-up, side plank, bird dog (descending rep protocol)
- Foam roller thoracic spine: 2 minutes
- Cat-cow mobilization: 10 reps
Day 1: Lower Body
- Glute bridge: 3x12
- Goblet squat (light): 3x10
- Band pull-through: 3x12
- Pallof press: 3x10 each side
- Dead bug: 3x8 each side
Day 2: Upper Body
- Dumbbell bench press (incline): 3x10
- Supported single-arm row: 3x10 each
- Band face pull: 3x15
- Dumbbell lateral raise: 2x12
- Farmer carry (light dumbbells): 3x30 seconds
Day 3: Full Body
- Trap bar deadlift (high handles, light): 3x8
- Goblet squat: 2x10
- Push-up (or incline push-up): 3x8-10
- Band pull-apart: 3x15
- Side plank (extra set): 2x20 seconds each side
Phase 2: Building (Weeks 5-8)
Goal: Increase loading on compound movements, introduce more challenging variations.
Schedule: 3 days per week, 40-45 minutes per session.
Day 1: Lower Body Focus
- Trap bar deadlift (high handles): 4x6 (add 5 lbs weekly)
- Goblet squat: 3x10 (add 2.5-5 lbs weekly)
- Single-leg glute bridge: 3x10 each side
- Bird dog with 5-second hold: 3x8 each side
- Pallof press (heavier band): 3x10 each side
Day 2: Upper Body
- Dumbbell bench press: 4x8
- Supported single-arm row: 4x8 each (add 2.5 lbs weekly)
- Standing dumbbell press (light): 3x10
- Band face pull: 3x15
- Dead bug (add light dumbbell in hand): 3x8 each side
Day 3: Full Body
- Trap bar deadlift (high handles): 3x5 (heavier than Day 1)
- Bulgarian split squat (bodyweight or light): 3x8 each leg
- Incline push-up or push-up: 3x10-12
- Band pull-through (heavier band): 3x12
- Farmer carry: 3x40 seconds (increase dumbbell weight)
Phase 3: Progression (Weeks 9-12)
Goal: Transition to low-handle trap bar deadlifts, increase volume, add back extensions if tolerated.
Schedule: 3-4 days per week, 45-50 minutes per session.
Day 1: Lower Body Strength
- Trap bar deadlift (low handles): 4x5 (add 5 lbs weekly)
- Goblet squat or dumbbell front squat: 3x8
- Romanian dumbbell deadlift: 3x10
- Back extension on Roman chair (bodyweight): 3x10
- Pallof press: 3x12 each side
Day 2: Upper Body Strength
- Dumbbell bench press: 4x6 (heavier)
- Supported dumbbell row: 4x6 each (heavier)
- Standing dumbbell press: 4x8
- Band face pull: 3x15
- Farmer carry (heavy): 3x45 seconds
Day 3: Full Body Volume
- Trap bar deadlift: 3x8 (moderate weight)
- Bulgarian split squat (holding dumbbells): 3x10 each leg
- Push-up: 3x12-15
- Band pull-apart: 3x20
- Dead bug (weighted): 3x10 each side
Day 4 (Optional): Active Recovery
- Foam rolling: 10 minutes (full body)
- Band pull-through: 2x15
- Cat-cow: 20 reps
- McGill Big 3 (extended holds)
- Light walking: 20 minutes
Managing Flare-Ups During Training
Flare-ups will happen. They do not mean you are injured or that your program failed. Here is a protocol for training through them without making things worse:
Acute flare-up (sharp pain, limited mobility):
- Stop the current exercise immediately
- Switch to McGill Big 3 only for 3-5 days
- Walk daily (20-30 minutes at a comfortable pace)
- Apply heat before movement, ice after
- Do not stretch aggressively -- gentle cat-cow only
Moderate flare-up (dull ache, stiffness, reduced tolerance):
- Reduce all weights by 50% for that session
- Increase rest periods to 3-4 minutes
- Replace trap bar deadlifts with band pull-throughs
- Replace goblet squats with bodyweight squats
- Continue upper body work if it does not aggravate symptoms
Post-flare-up return:
- Drop back one phase in the program (e.g., if you are in Phase 2, return to Phase 1 weights)
- Rebuild over 1-2 weeks rather than jumping back to where you were
- Identify the trigger (too much weight? insufficient warm-up? poor sleep? high stress?) and address it
Gym Setup Tips for Back Pain Sufferers
Your gym layout matters more than you might think when back pain is a factor.
Flooring: Install rubber stall mats (3/4 inch thick minimum). They provide cushioning for exercises performed on the floor (dead bugs, bird dogs, glute bridges) and protect your back from cold, hard concrete. Two 4x6 foot mats create an 8x6 foot training area for about $100 total. See our flooring guide for detailed recommendations.
Temperature control: Cold muscles are stiff muscles, and stiff muscles aggravate back pain. If you train in a garage, a portable space heater during winter months can prevent flare-ups triggered by cold. Our winter garage gym training guide covers heating solutions in depth.
Mirror placement: Mount a mirror on the wall facing your deadlift platform. Visual feedback on spinal position is the fastest way to correct form breakdown before it causes pain. This is especially important during trap bar deadlifts and goblet squats.
Equipment arrangement: Keep your foam roller and bands within arm's reach of your training area. If you have to dig through a closet to find your foam roller, you will skip the warm-up. And skipping the warm-up is the number one preventable cause of flare-ups.
Nutrition and Recovery Considerations
Training is only half the equation. Recovery determines how fast your back improves.
- Sleep 7-9 hours. Sleep deprivation increases pain sensitivity by up to 25% in clinical studies. Your discs also rehydrate during sleep, which is why back pain is often worse in the morning and improves as you move.
- Maintain a healthy body weight. Every extra pound of body weight adds approximately 4 lbs of force to your lumbar spine during movement. Losing even 10 lbs can produce noticeable back pain improvement.
- Eat sufficient protein. Aim for 0.7-1.0 grams per pound of body weight daily to support the muscle-building process. Muscles that do not recover cannot protect your spine. Check out our home gym nutrition basics guide for practical meal strategies.
- Stay hydrated. Intervertebral discs are approximately 80% water. Chronic dehydration contributes to disc degeneration and reduced shock absorption.
- Consider anti-inflammatory foods. Omega-3 fatty acids (fatty fish, walnuts, flaxseed), turmeric, and tart cherry juice have modest but real anti-inflammatory effects that complement your training program.
When to Progress and When to Hold Back
A common mistake is progressing too fast because you feel good. Back pain is cyclical -- good weeks are followed by tougher weeks, and aggressive progression during a good phase often triggers the next bad phase.
Safe progression rules:
- Add weight only when you can complete all prescribed reps with perfect form and zero pain
- Never increase load by more than 5 lbs per week on any exercise
- If you miss a session due to a flare-up, restart that week rather than skipping ahead
- Track your workouts in a simple notebook: date, exercise, weight, reps, pain level (0-10)
- A pain level of 0-2 during exercise is acceptable; 3-4 means reduce weight; 5+ means stop
Signs you are ready to advance to the next phase:
- Completing all sessions for 2 consecutive weeks with pain levels of 0-1
- Sleeping through the night without back pain waking you
- Able to perform daily activities (bending, lifting groceries, playing with kids) without guarding
Common Questions
Can I lift weights with chronic back pain?
Is a trap bar deadlift really safer than a conventional deadlift for back pain?
What is the McGill Big 3 and why should I do it every day?
Should I avoid squats entirely if my back hurts?
How long until I see improvement in my back pain from training?
Is bed rest good for back pain?
What should I do during a back pain flare-up?
Do I need a physical therapist or can I do this on my own?
How much does a back-friendly home gym cost?
Additional Resources
Related Content
- Home Gym Rehab and Recovery
- Home Gym for Seniors
- Bells of Steel Trap Bar Review
- Bodylastics Resistance Bands Review
- Home Gym Programming Guide
- Home Gym for Postpartum Recovery: Safe Return to Training (2026)
- How to Choose Gym Flooring
- Winter Garage Gym Training
The Bottom Line
Back pain is not a reason to avoid the gym. It is a reason to build one at home where you control every variable. A trap bar, adjustable dumbbells, resistance bands, a bench, and a foam roller give you everything you need to follow the same evidence-based rehabilitation protocols used in the best sports medicine clinics in the world.
The McGill Big 3 done daily will build the core endurance foundation. Progressive trap bar deadlifts will strengthen your posterior chain. Goblet squats, supported rows, and band work will fill in the gaps. Flare-ups will happen, and you will train through them intelligently rather than retreating to the couch.
The research is clear: the strongest backs are the most pain-free backs. Your home gym is the most efficient, affordable, and sustainable path to building one. Start with Phase 1 this week, trust the process, and give your spine the strength it has been missing.
Marcus Reid
Powerlifter and mechanical engineer who has been building and breaking home gym equipment for 15 years.
Read full bioMore in Guides
Strength vs Hypertrophy: How to Program for Your Goals (2026)
The definitive guide to programming for strength vs size in your home gym. Rep ranges, volume, intensity, and complete programs for both goals.
The Complete Home Gym Warm-Up Guide (2026)
Stop skipping your warm-up. Complete warm-up protocols for every training style, plus the equipment that makes preparation effortless at home.
Home Gym Deload Guide: When and How to Back Off (2026)
Learn when and how to deload in your home gym. Science-backed protocols, recovery strategies, and signs you need a rest week.