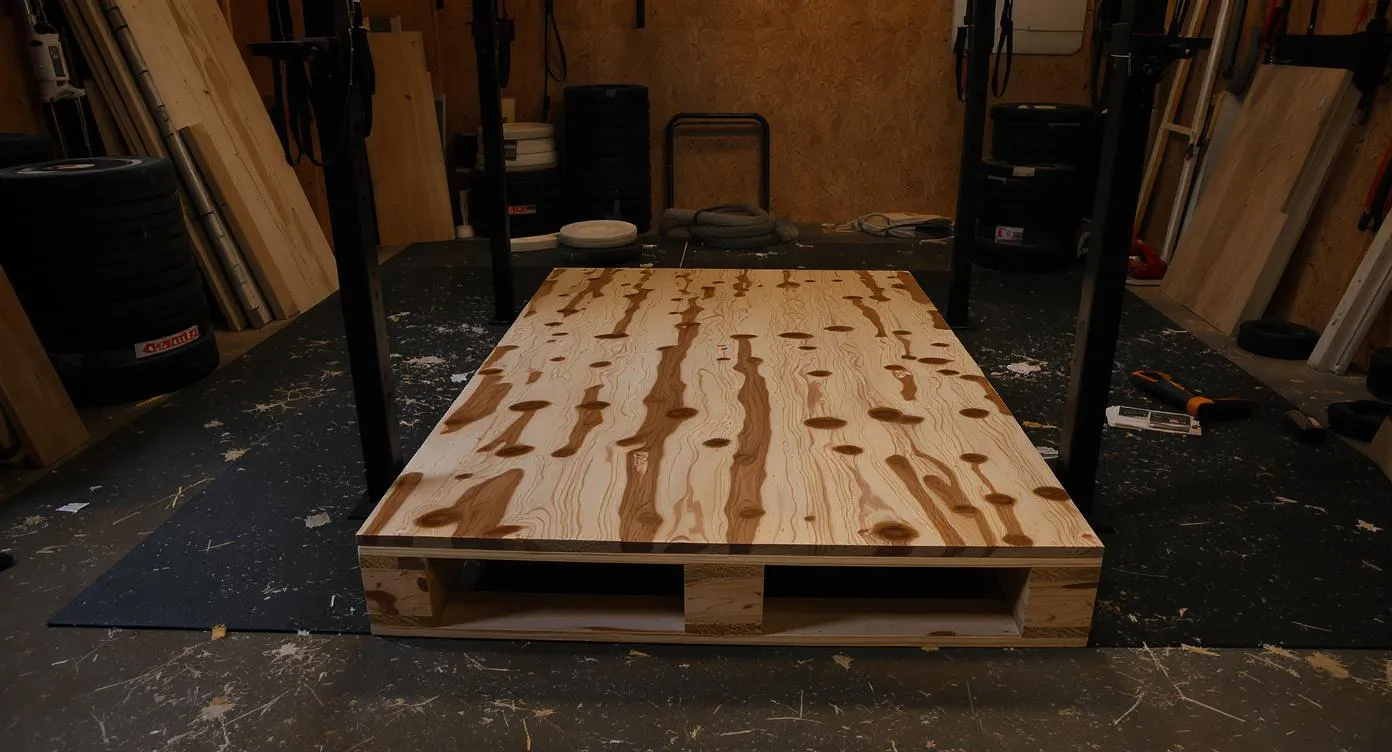
How to Build a DIY Lifting Platform (Step-by-Step Guide)
Build a sturdy, professional lifting platform for under $200. Complete step-by-step guide with materials list, tools needed, and construction photos.
If you are serious about barbell training in your garage, a lifting platform is one of the highest-return projects you can build. It protects your concrete slab from the repeated punishment of heavy deadlifts and cleans. It absorbs noise that would otherwise travel through your foundation and into every room in the house. It gives you a dead-flat, rock-solid surface that eliminates the wobble and shifting you get from rubber mats alone. And it lets you bolt your power rack down without drilling into your garage floor.
The best part: a full 8x8-foot lifting platform costs under $200 in materials and takes a single afternoon to build. No advanced woodworking skills required. If you can operate a circular saw and a drill, you can have a competition-grade training surface ready by dinnertime.
This guide walks through every step in detail, from choosing the right plywood grade to avoiding the mistakes that cause platforms to fail after a few months of heavy use. Whether you are pulling 225 or 600, the build is the same.
Why Every Garage Gym Needs a Lifting Platform
A lifting platform is not a luxury upgrade. For anyone doing Olympic lifts, deadlifts, or heavy barbell work, it is a structural necessity. Here is what it actually does for your training environment.
Floor Protection That Actually Works
A standard 4-inch residential garage slab is designed for car tires, not for a 405 lb deadlift dropped from hip height. That single drop generates roughly 5,000-7,000 lbs of instantaneous force concentrated on two small plate-contact points. Without a platform to distribute that energy across a broader surface area, your concrete develops hairline cracks that spider-web into expensive structural problems within months. A double-layer plywood platform with 3/4-inch rubber drop zones spreads the impact force across eight square feet instead of two contact points, reducing the per-square-inch load by over 90%.
Noise and Vibration Dampening
Impact noise from barbell drops transmits through concrete, into your foundation footings, and up through the framing of your house. If you train early mornings or late evenings, this matters. A properly built platform with rubber drop zones reduces noise transmission by 15-25 dB compared to dropping on bare concrete or even single-layer rubber mats. The plywood layers act as a decoupling membrane, breaking the direct vibration path between your weights and the slab beneath.
A Stable, Level Lifting Surface
Most garage floors are not flat. They slope toward the door for drainage, sometimes by as much as 1/4 inch per foot. That slope is imperceptible when you are walking around, but it becomes very noticeable when you have 400 lbs on your back. A shimmed and leveled platform eliminates this problem completely, giving you a true horizontal surface for squats, deadlifts, overhead press, and Olympic lifts.
Power Rack Anchoring Without Drilling Concrete
Bolting your power rack to a lifting platform gives you rock-solid stability without ever touching your concrete floor. You drill through plywood, not through your slab. This means no rental hammer drill, no concrete anchors, and no permanent holes in your garage floor. If you ever sell the house or rearrange your gym, the platform and rack come out as a unit with zero damage to the underlying concrete.
It Defines Your Training Space
This is the underrated benefit. A platform creates a psychological boundary: when you step onto it, you are in the gym. That mental separation between "garage" and "training facility" is surprisingly motivating. It also gives your gym a professional look that makes the whole space feel intentional rather than improvised.
Materials List and Cost Breakdown
Here is everything you need. Most of these materials are available at Home Depot, Lowe's, or your local lumber yard. The horse stall mats are cheapest at Tractor Supply Co. (TSC).
Equipment Checklist
11 itemsTotal materials cost: ~$200 or less
You likely already own the tools. If not, a budget circular saw (Skil, Ryobi, or HART) costs $40-60 and pays for itself on the first project. A cordless drill/driver is a garage gym essential you will use repeatedly for rack assembly, wall mounts, and future projects.
Choosing the Right Platform Size
Standard Platform: 8 x 8 Feet
This is the recommended size for most garage gyms. A loaded Olympic barbell is 7 feet 2 inches long. An 8-foot-wide platform gives you 5 inches of clearance on each side, which means your plates always land on rubber even if the bar drifts slightly during a heavy pull. The 8-foot depth gives you enough room to stand, set up, and step back for squats without your heels hanging off the edge.
Compact Platform: 8 x 6 Feet
If your garage is a tight single-car layout, an 8x6 platform works but has trade-offs. You lose 12 inches of depth, which means less room behind the bar for squat walkouts. The width stays at 8 feet because going narrower means plates hang off the edge during deadlifts. Only go 8x6 if you physically cannot fit an 8x8.
Extended Platform: 8 x 10 or 8 x 12 Feet
If you do Olympic weightlifting (snatch, clean and jerk), consider extending the depth to 10 or 12 feet. Olympic lifts require more room for foot movement, catching, and bailing. An extra sheet of plywood and another stall mat bring the cost to about $270 and give you serious breathing room.
Step-by-Step Build Instructions
Step 1: Prepare the Garage Floor
Clear the area completely. Sweep the concrete and remove any debris, pebbles, or raised spots that could create unevenness under the platform. Lay your 4-foot level across the floor in multiple directions to identify any slope or low spots.
If the floor slopes (most garage floors do), note where the low spots are. You will shim these during assembly. Even a half-inch of tilt feels dangerous with heavy weight on your back.
Now lay your 6-mil polyethylene vapor barrier sheeting over the entire platform footprint. Overlap the edges by a few inches and let it extend 6 inches past where the platform edges will sit. This plastic sheet prevents moisture from wicking up through the concrete and rotting your plywood from the bottom. Concrete sweats, especially during temperature swings between seasons, and trapped moisture breeds mold. This $8 precaution adds years to the platform's life.
Step 2: Build the First Plywood Layer (The Base)
Lay the first two full 4x8 sheets of plywood side by side on top of the vapor barrier. These two sheets give you an 8x8 footprint. For an 8x8 platform, you need the sheets oriented so they cover 8 feet wide by 4 feet deep each, stacked front to back.
If your platform is exactly 8x8, you will use portions of your third plywood sheet to create the second layer. Cut the third sheet according to the layout described in Step 3.
Check levelness again with your 4-foot level placed on top of the plywood. If you find low spots, slide thin plywood shims underneath until the entire base layer is dead flat. Take your time here. A level base is the foundation of the entire build, and you cannot fix it once the upper layers are glued and screwed.
Step 3: Glue and Screw the Second Plywood Layer
This is the most important structural step. The double-layer plywood construction is what gives the platform its rigidity and load-bearing strength. A single layer of 3/4-inch plywood will flex under heavy loads and crack within months.
Apply Liquid Nails Heavy Duty construction adhesive in a zigzag pattern across the entire top surface of the base layer. Use a generous amount — roughly one full tube per 4x8 sheet. The adhesive does most of the structural bonding work; the screws primarily hold the layers together while the glue cures.
Lay the second layer of plywood on top, offsetting the seams from the first layer by at least 24 inches. This staggered seam pattern is critical. If seams align vertically between layers, that joint becomes a hinge point that flexes under load and eventually cracks. Offsetting the seams distributes stress evenly across the platform.
Drive #8 wood screws (1-5/8 inch length) every 10-12 inches in a grid pattern across the entire surface. Pre-drill if your plywood tends to split — exterior-grade ply is dense and can crack near edges without pilot holes. Drive screws snug but not overtight. Cranking screws too hard into plywood causes the wood to split around the screw head, weakening the joint rather than strengthening it.
Step 4: Cut and Place the Rubber Drop Zones
Your two 4x6 horse stall mats from Tractor Supply Co. need to be cut to fit the left and right sections of the platform. For a standard 8x8 layout, each rubber section is 2 feet wide by 8 feet long (or two pieces per side, depending on your mat dimensions).
Mark your cuts with a straightedge and chalk line. Cut stall mats from the bottom side using a sharp utility knife — score the line repeatedly rather than trying to cut through in one pass. A fresh blade and a straightedge make this much easier. Stall mats are dense vulcanized rubber and dull blades quickly, so have spare blades on hand.
Apply construction adhesive to the plywood surface in the drop zones and press the cut rubber sections firmly into place. The rubber should sit flush with the plywood surface or very slightly above it. Weight the rubber down with plates or heavy objects and allow the adhesive to cure for 24 hours before heavy use.
Step 5: Finish the Center Standing Section
The center 4-foot-wide section stays as bare plywood. This is your standing surface for squats, deadlifts, overhead presses, and Olympic lifts. Hard plywood provides the firm, non-compressive footing that serious barbell work demands. Thick rubber under your feet during a heavy squat actually works against you — your feet sink slightly with each rep, wasting energy and reducing stability.
For moisture protection, apply two coats of polyurethane sealant or exterior wood stain to the center plywood section. This prevents sweat, chalk, and spilled water from soaking into the wood grain and causing warping or delamination. Let each coat dry fully (4-6 hours minimum) before applying the next.
Final Platform Layout
[  RUBBER (2ft)  |  PLYWOOD (4ft)  |  RUBBER (2ft)  ]
[    Drop Zone   |  Standing Area   |   Drop Zone    ]
[                     8ft x 8ft                       ]
The center plywood section is where you stand for all barbell movements. The rubber sections on each side are where plates contact the platform during deadlifts, cleans, snatches, and any controlled drops.
Recommended Gear for Your New Platform
Once your platform is built, you need the right equipment on top of it. Here are the essentials that pair best with a dedicated lifting platform.

Synergee Games 15kg and 20kg Colored Ceramic Coated Barbells
Capacity
1,500 lbs rated capacity
Steel
Ceramic Coated Steel / Needle Bearings
Footprint
28.5mm Shaft, 7ft Olympic Bar
Price
$149.95
- 4.7+ star rating on Amazon
- 1,000 lb capacity at mid-range price
- Needle bearings provide smooth spin for Olympic lifts
- 190K PSI tensile strength
- Dual knurling marks for powerlifting and Olympic lifts
- Best Amazon-available upgrade from budget bars
- Black phosphate finish requires regular oiling
- Not made in the USA
- Knurling is slightly less aggressive than premium bars
Price and availability may change
A quality Olympic barbell is the centerpiece of any platform setup. The Synergee Regional barbell offers needle bearings, a 1,000 lb rating, and aggressive knurling at a price point that leaves budget for plates.

Yes4All 2" Bumper Plate, Olympic Rubber Weight Plate with Steel Hub
Capacity
10-190 lbs options
Steel
Olympic Rubber / Steel Hub
Footprint
17" diameter
Price
$86.00
- 4.6+ star rating on Amazon with 10,000+ reviews
- Cast iron durability
- Standard Olympic 2" hole fits all bars
- Available in individual pairs to build up your set
- Great for expanding an existing set
- Best value for adding weight
- Not competition-calibrated (weight tolerance ±2%)
- Painted finish can chip
- Not safe to drop on concrete (no rubber coating)
- Thicker than premium plates
Price and availability may change
Cast iron Olympic plates are the workhorse choice for platform training. They are inexpensive, indestructible, and sized to standard Olympic dimensions. Just keep in mind that cast iron should not be dropped from height — that is what your rubber drop zones are for with controlled lowering.

BalanceFrom Puzzle Exercise Mat 1/2' Thick, EVA Interlocking Foam Floor Tiles for Home Gym, Mat for Home Workout Equipment, Floor Padding for Kids, Black, 24 in x 24 in x 1/2 in, 24 Sq Ft - 6 Tiles
Capacity
N/A — flooring
Steel
High-Density EVA Foam (1/2" thick)
Footprint
24 sq ft (6 tiles)
Price
$25.99
- 4.5+ star rating on Amazon with 40,000+ reviews
- 24 sq ft covers a full lifting platform area
- 1/2 inch thick EVA foam absorbs impact and noise
- Interlocking design — no adhesive needed
- Easy to cut for custom fit around racks
- Best budget gym flooring on Amazon
- Puzzle seams can separate under heavy racks
- Not as durable as horse stall mats for deadlifts
- Slight chemical smell for first few days
Price and availability may change
If you want to extend floor protection beyond your platform footprint — around your bench, dumbbell area, or accessory equipment — these EVA foam tiles are an affordable way to cover additional square footage.
Pros and Cons of a DIY Lifting Platform
- Costs under $200 vs. $500-$1,500 for commercial platforms
- Builds in 2-3 hours with basic tools
- Fully customizable dimensions for your space
- Protects concrete from cracking under heavy drops
- Reduces noise transmission by 15-25 dB
- Provides a level surface on sloped garage floors
- Lets you bolt your power rack without drilling concrete
- Increases resale appeal of your garage gym setup
- Weighs 250-350 lbs when complete — difficult to move
- Does not fit through standard doorways in one piece
- Requires a circular saw and drill (basic tools)
- Takes up a permanent 8x8 ft footprint in your garage
- Horse stall mats have a strong rubber smell for the first 1-2 weeks
- Must be shimmed carefully on uneven floors
How to Bolt Your Power Rack to the Platform
One of the biggest advantages of a lifting platform is using it as a rack anchor point. Here is how to do it properly.
Mark the bolt hole positions by setting your rack in its final position on the platform and tracing the foot holes with a pencil. Remove the rack and drill through the double-layer plywood using a 3/8-inch drill bit. Place the rack back over the holes and secure each foot with 3/8-inch x 3.5-inch lag bolts, flat washers, and lock washers.
Tighten each lag bolt until snug, then give it an additional quarter turn. Do not overtighten — you want the bolt firmly seated in the wood, not stripping through the plywood. The double layer of 3/4-inch plywood (1.5 inches total) provides more than enough thread engagement for any home gym rack. For detailed guidance on rack anchoring methods, see our complete power rack anchoring guide.
Common Platform Building Mistakes (and How to Avoid Them)
Using OSB or Interior-Grade Plywood
Oriented strand board (OSB) is cheaper than plywood, and some builders try to save $20-30 by substituting it. This is a false economy. OSB delaminates rapidly with moisture exposure and impact stress. Within a few months of garage conditions (humidity swings, condensation, sweat), OSB layers separate and the platform develops soft spots.
Even among plywood, quality matters. Exterior-grade or marine-grade plywood uses waterproof adhesive between layers and handles the temperature and humidity swings of a garage environment without delaminating. Interior-grade plywood uses moisture-susceptible glue that fails within a year in most garage settings. The price difference is $10-15 per sheet. Spend the extra money.
Building Too Small
An 8x6 platform sounds reasonable until you load a full-size Olympic barbell. A loaded bar is over 7 feet long. If your platform is only 6 feet wide, plates hang off the edges and land on bare concrete, defeating the entire purpose. If 8x8 fits in your space, build 8x8. If it does not, go 8x6 but keep the 8-foot width and sacrifice depth instead.
Aligning Seams Between Layers
This is the structural mistake that causes platforms to fail prematurely. When the plywood seams in the top layer sit directly above the seams in the bottom layer, the platform has a full-depth crack running across it. Every heavy load concentrated on that line causes the platform to flex like a hinge. Stagger your seams by at least 24 inches between layers. This single detail doubles the effective lifespan of your platform.
Skipping the Rubber Drop Zones
Some builders leave the entire platform surface as bare plywood to save the $100 cost of two stall mats. This is the most expensive mistake on the list. Without rubber to absorb impact energy, every deadlift set hammers the plywood directly. Within months, the outer plywood sections crack through both layers. The rubber sections are not optional — they are the primary impact protection for the platform's structure.
Not Leveling the Platform
A platform built on a sloped garage floor inherits that slope. It might seem minor, but even a half-inch tilt across 8 feet creates an asymmetric loading pattern during squats and presses. Your body compensates unconsciously, leading to imbalanced muscle development and potential injury over time. Level the base layer with shims before you glue anything together.
Forgetting the Vapor Barrier
Concrete sweats. Moisture vapor migrates upward through the slab constantly, especially during spring and fall temperature transitions. Without a plastic vapor barrier between the concrete and the plywood, this moisture gets trapped against the bottom of your platform. Within one season, you will find mold growth and the bottom plywood layer will start to soften and rot. A $8 sheet of 6-mil poly prevents this entirely.
Platform Maintenance and Longevity
A well-built platform requires minimal maintenance, but a few habits keep it performing for 5-10 years.
Monthly: Sweep the rubber sections and vacuum chalk dust from the plywood center. Chalk buildup makes the standing surface slippery when mixed with sweat.
Quarterly: Inspect the rubber-to-plywood seams for separation. If an edge lifts, reapply construction adhesive and weight it down for 24 hours. Check all visible screws for looseness and snug any that have backed out.
Annually: Flip or rotate the rubber sections if one side shows more wear than the other. Reapply polyurethane to the center plywood section if the original coat shows wear-through. Check the underside for moisture or mold by lifting one edge — if the vapor barrier is intact, you should see dry wood.
When to rebuild: If the center plywood develops a noticeable bow, soft spots, or delamination, replace that section. You do not need to rebuild the entire platform — unscrew the damaged piece, scrape off old adhesive, and install a new sheet. This $30 repair takes under an hour and resets the platform to like-new condition.
Optional Upgrades Worth Considering
Polyurethane or epoxy finish on the center section. Two coats of exterior-grade polyurethane seals the wood against moisture, sweat, and chalk. It also makes cleaning easier and gives the platform a polished look.
Custom logo or gym name. Use a stencil and spray paint (or vinyl decals) to add your gym name or logo to the center plywood section. Apply this between polyurethane coats for durability. It costs $5-10 and makes the platform look like a commercial training facility.
Rubber edge trim. L-shaped rubber molding around the platform perimeter gives a finished look and prevents the plywood edges from splintering over time. Available at most hardware stores for $15-20.
Band pegs. Drill holes in the platform corners and install steel band pegs for accommodating resistance training. These let you attach resistance bands to the platform for banded deadlifts, squats, and bench press variations. A set of four steel pegs costs $20-30 and opens up a new training dimension.
Anti-fatigue mat for the standing section. If you do high-rep work or long training sessions, a thin (1/4-inch) rubber mat over the center plywood reduces foot fatigue without compromising stability for heavy lifts. Remove it for max-effort days when you want maximum firmness underfoot.
How a Platform Compares to Rubber Mats Alone
If you have already read our complete garage gym flooring guide, you might wonder whether a platform is necessary when you already have stall mats covering your floor. The answer depends on your training style.
Rubber mats alone work fine for general fitness, dumbbell work, machine-based training, and light barbell work. They protect concrete, reduce noise, and provide a comfortable standing surface.
A lifting platform adds three things that rubber mats alone cannot provide: a rigid, non-compressive standing surface for heavy squats and pulls; a double-layer plywood base that distributes impact force far more effectively than rubber on concrete; and a dedicated bolt-down anchor point for your rack that does not require drilling into the slab.
If you deadlift over 225 lbs, squat over 315 lbs, or do any Olympic lifting, a platform is a meaningful upgrade. If your training is primarily bodyweight, dumbbells, and machines, mats alone are sufficient. For a comprehensive overview of setting up your entire training space, see our complete guide to building a garage gym.
Frequently Asked Questions
Can I bolt my power rack directly to the lifting platform?
How long does a DIY lifting platform last?
Do I need a lifting platform if I already have horse stall mats?
Can I move a lifting platform if I rearrange my garage?
What if my garage floor is not level?
How thick should the plywood be?
Can I build a platform in a second-floor home gym or apartment?
What type of rubber mats should I use for the drop zones?
Additional Resources
The Bottom Line
A DIY lifting platform is one of the best investments you can make in your garage gym. For under $200 and a few hours of work, you get a professional-grade training surface that protects your floor, dampens noise, levels your lifting area, and anchors your rack. It transforms a section of your garage from a makeshift workout space into a legitimate training facility.
Build it right the first time — exterior-grade plywood, staggered seams, vapor barrier underneath, rubber drop zones on both sides — and it will serve you for years of heavy training without a single issue. If you are still setting up the rest of your gym, check our guide to choosing the right barbell to pair with your new platform.
Related Guides
Marcus Reid
Powerlifter and mechanical engineer who has been building and breaking home gym equipment for 15 years.
Read full bioMore in Guides
Strength vs Hypertrophy: How to Program for Your Goals (2026)
The definitive guide to programming for strength vs size in your home gym. Rep ranges, volume, intensity, and complete programs for both goals.
The Complete Home Gym Warm-Up Guide (2026)
Stop skipping your warm-up. Complete warm-up protocols for every training style, plus the equipment that makes preparation effortless at home.
Home Gym Deload Guide: When and How to Back Off (2026)
Learn when and how to deload in your home gym. Science-backed protocols, recovery strategies, and signs you need a rest week.