How to Choose a Weight Bench: Complete Buyer's Guide (2026)
Everything you need to know before buying a weight bench. Adjustable vs flat, pad width, weight capacity, stability — all explained.
Buy an adjustable flat-to-incline bench with a steel frame rated to 1,000+ lbs, a pad width of 11-12 inches, and no wobble at heavy loads — the REP AB-3000 and Flybird FB149 are the top picks at mid and budget price points.
A weight bench is the second-most important purchase in any home gym, right behind the power rack. It unlocks the barbell bench press, incline dumbbell work, seated overhead press, hip thrusts, step-ups, rows, and dozens of other movements that are impossible or awkward to perform without a stable horizontal surface. Choose the wrong bench and you deal with wobbly pads, uncomfortable gaps, and a piece of equipment you quietly resent every training session. Choose the right one and it becomes the workhorse of your gym for a decade or longer.
This guide breaks down every specification, feature, and trade-off so you can buy once and buy right.
Why the Weight Bench Matters More Than You Think
Most beginners focus on barbells, plates, and racks. The bench gets treated as an afterthought, something cheap you grab at the end of the budget. That is a mistake.
A poor-quality bench introduces three real problems:
- Instability under load. A bench that wobbles at 225 lbs will shake your confidence and compromise your bar path. That costs you reps and, over time, strength gains.
- Discomfort that limits training volume. A pad that is too narrow, too soft, or poorly angled means you spend mental energy compensating instead of pressing. You cut sets short because the bench is fighting you.
- Safety risk during failure. If a bench collapses or tips under a heavy bench press, you have a loaded barbell on your chest with no escape. It has happened. Cheap benches with inflated weight ratings are the usual culprit.
A good bench, by contrast, disappears during your workout. You set up, retract your shoulders, plant your feet, and press. The bench is just there, solid and stable, exactly where it should be.
Bench Types: Which One Do You Need?
There are four main categories of weight bench. Understanding which type fits your training style saves you from buying twice.
Flat Bench
A flat bench is a simple, fixed horizontal surface with no adjustability. It is the most stable design because there are no moving parts, hinges, or locking mechanisms that can introduce play.
- Best for: Dedicated powerlifters who only flat bench, or lifters who already own an adjustable bench and want a second station
- Typical cost: $80 to $250
- Weight capacity: Often 1,000 lbs+ because the simple frame has no weak points
- Skip if: You want incline pressing, seated shoulder press, or any angled dumbbell work
Flat benches from brands like Rogue, REP Fitness, and Titan Fitness are built like tanks. If you run a powerlifting-focused setup and bench press is your primary horizontal push, a dedicated flat bench delivers unmatched stability.
Adjustable Flat-Incline Bench (FI Bench)
This is the standard recommendation for most home gym owners. An FI bench adjusts from flat (0 degrees) through various incline angles up to roughly 85 degrees (near-vertical for seated overhead work).
- Best for: General strength training, bodybuilding, and anyone who wants versatility
- Typical cost: $100 to $500
- Weight capacity: 600 to 1,200 lbs depending on build quality
- Buy this if: You want one bench that covers flat press, incline press, shoulder press, chest-supported rows, and seated curls
The FI bench is the right choice for roughly 80 percent of home gym owners. It handles every common bench movement and pairs perfectly with a power rack and a set of adjustable dumbbells.
FID Bench (Flat/Incline/Decline)
An FID bench adds decline capability, typically negative 10 to negative 30 degrees below horizontal. This requires a leg hold-down or foot roller to keep you from sliding off the pad during decline pressing.
- Best for: Bodybuilders who specifically want decline bench press or decline flyes
- Typical cost: $200 to $600
- Weight capacity: 600 to 1,000 lbs
- Worth it if: Decline pressing is part of your regular program and you do not want to improvise with blocks under the feet of a flat bench
The reality is that most lifters rarely use decline. Flat and low-incline pressing already hit the lower chest effectively. Unless you have a specific reason, the FI bench is usually the smarter purchase.
Olympic Weight Bench (Bench With Integrated Uprights)
An Olympic weight bench combines the bench pad with built-in barbell uprights and sometimes a leg developer or preacher curl station. It is an all-in-one solution for lifters who do not own a separate rack.
- Best for: Beginners on a tight budget who want to bench press without buying a separate rack
- Typical cost: $200 to $450
- Weight capacity: 300 to 600 lbs on the bar (the uprights are the limiting factor)
- Skip if: You already own a power rack or plan to buy one. The integrated uprights become dead weight once you have a rack.
For most home gym owners, the adjustable flat-incline bench is the right choice. It offers the best combination of versatility, stability, and long-term value.
The 8 Specifications That Actually Matter
Bench marketing is full of inflated claims and meaningless features. These are the eight specs that genuinely affect your training experience.
1. Weight Capacity
Weight capacity is the single most important safety specification. But the number on the box does not tell the whole story.
Manufacturer ratings are static load tests. They place weight on the bench, confirm it does not collapse, and print that number. Real-world benching involves dynamic force. When you lower 225 lbs to your chest and reverse the bar, the momentary load on the bench spikes well above 225 lbs. Racking and unracking also create lateral forces that static tests ignore.
What to buy based on your strength level:
- Beginner (bench press under 185 lbs): 500 lb rated bench minimum
- Intermediate (bench press 185 to 315 lbs): 700 to 1,000 lb rated bench
- Advanced (bench press 315+ lbs): 1,000 to 1,500 lb rated bench
Rule of thumb: Buy a bench rated for at least 3x your heaviest bench press. If you bench 225 lbs and weigh 200 lbs, your combined load is 425 lbs. A 700 lb rated bench gives you proper safety margin plus room to grow.
Do not trust brands that claim 1,000+ lb capacity on a bench that weighs 30 lbs and costs $90. Physics does not work that way. A bench with genuine high capacity will weigh 50 to 75 lbs or more because the steel frame needs mass to support real loads.
2. Pad Width
Pad width directly affects your bench press setup. During heavy pressing, you retract your scapulae (pull your shoulder blades together and down) to create a stable shelf. If the pad is too narrow, your shoulders hang off the edges, making it impossible to maintain retraction under load.
- 10 inches or less: Budget benches. Functional for smaller lifters under 160 lbs, but feels cramped for larger athletes
- 10.5 to 11.5 inches: Standard width. Works for most adults and covers the majority of home gym use cases
- 12 inches: Competition width per IPF specifications. Ideal for serious bench pressers who want maximum shoulder support
- 12.5+ inches: Extra-wide. Some lifters find this too wide for dumbbell work because it restricts arm path
The sweet spot for most home gym lifters is 11 to 12 inches. If you weigh over 200 lbs or have broad shoulders, lean toward 12 inches. If you do a lot of dumbbell work, avoid going wider than 12 inches because the pad will interfere with your range of motion at the bottom of dumbbell presses.
3. Pad Thickness and Foam Density
The pad needs to be firm enough to provide a stable pressing surface but not so hard that it creates pressure points during longer sets.
- Too soft (cheap foam): Your back sinks into the pad, destroying your arch and shoulder retraction. Under heavy loads, you feel like you are pressing on a mattress. Terrible for anything over 135 lbs.
- Medium-firm (high-density foam): The correct choice. Your back compresses the pad roughly a quarter inch and then hits a firm base. You feel supported without sinking.
- Rock hard (over-dense or thin foam): Uncomfortable for sets longer than three reps. Creates pressure points on your spine and scapulae. Some competition benches are this firm intentionally, but it is not ideal for general training.
Good benches use high-density foam rated at 40 to 50 ILD (Indentation Load Deflection). You will not find this spec listed on most product pages, but you can test it in person: push your fist into the pad. It should compress slightly and then resist firmly. If your fist sinks more than half an inch with moderate pressure, the foam is too soft.
Pad thickness of 2.5 to 3 inches is standard. Thinner pads wear out faster and offer less comfort. Thicker pads can feel unstable. Vinyl or synthetic leather covering should be grippy enough to prevent your shirt from sliding during heavy sets but not so tacky that it grabs uncomfortably.
4. Adjustment Positions and Angle Range
More adjustment positions mean finer control over your pressing angle. This matters most for hypertrophy-focused lifters who want to target specific portions of the chest and shoulders.
- 3 to 4 positions: Budget benches. Typically flat, 30 degrees, 45 degrees, and upright. Functional but limited.
- 5 to 7 positions: The sweet spot for home gyms. Gives you flat, low incline (15 degrees), moderate incline (30 degrees), high incline (45 degrees), steep incline (60 degrees), and upright (85 degrees).
- 8 to 12 positions: Premium benches. Very fine angle adjustments for lifters who are particular about hitting exact angles.
Key angles every adjustable bench should offer:
- Flat (0 degrees): Standard bench press, dumbbell press, dumbbell flyes
- Low incline (15 to 30 degrees): Upper chest emphasis without excessive shoulder involvement. This is the most useful incline angle for most lifters.
- Moderate incline (45 degrees): Traditional incline press. Significant shoulder recruitment.
- Steep incline to upright (60 to 85 degrees): Seated overhead press, seated curls, seated lateral raises
The seat pad should also adjust independently. A good bench has 2 to 3 seat positions so you can angle the seat slightly upward at steep inclines to prevent your body from sliding down the pad.
5. Zero-Gap Design
This is the feature that separates budget benches from premium benches, and it matters more than most people realize.
The problem: On cheaper adjustable benches, when you set the backrest to an incline position, a gap opens between the seat pad and the backrest. At 30 degrees this gap is small and barely noticeable. At 45 to 60 degrees the gap can be 2 to 4 inches wide. Your lower back falls into this gap, creating an uncomfortable pressure point and reducing stability during heavy incline pressing.
Zero-gap benches use a linkage system that keeps the seat pad and backrest flush at every angle. When you increase the incline, the seat pad shifts forward and tilts up to meet the backrest seamlessly. There is no gap at any position.
- Eliminates the uncomfortable gap at incline positions
- Provides full lower-back support at every angle
- More stable platform for heavy incline and shoulder pressing
- Feels dramatically better during high-rep dumbbell work
- Adds $50 to $150 to the bench price
- Slightly more complex mechanism with more moving parts
- Heavier overall bench weight (not ideal if you need to move it frequently)
Is zero-gap worth it? If you regularly incline press with heavy dumbbells or barbells above 45 degrees, absolutely. If you mostly flat bench and only occasionally use low incline, the gap is less of an issue. Budget benches like the FLYBIRD work fine for most users despite the gap at steep angles.
6. Frame Material and Steel Gauge
The frame determines how long your bench lasts and how stable it feels under load.
- 14-gauge steel: Thinnest acceptable option. Found on budget benches under $150. Adequate for loads under 500 lbs but may develop wobble over time as joints wear.
- 12-gauge steel: The standard for quality home gym benches. Noticeably stiffer and more durable than 14-gauge. Handles 700 to 1,000+ lb loads without flex.
- 11-gauge steel: Commercial grade. Found on benches from Rogue, REP Fitness, and similar brands. Overkill for most home gym users but will outlast you.
Beyond gauge, look at the frame geometry. A triangular or tripod base design (three contact points with the floor) is inherently more stable than a rectangular base (four points) because three points always sit flat, even on an uneven garage floor. Rectangular bases can rock if one leg is slightly shorter.
Rubber or rubberized feet are essential. They prevent the bench from sliding on smooth concrete or rubber flooring and protect your gym floor from scratches.
7. Bench Height (Seat Height From Floor)
Standard bench height is 17 to 18 inches from the floor to the top of the pad. This measurement affects your ability to plant your feet during bench press.
- Under 17 inches: Low profile. Better for shorter lifters (under 5 foot 7) who struggle to get their feet flat on a standard bench.
- 17 to 17.5 inches: Standard. Works for most adults between 5 foot 6 and 6 foot 2.
- 18+ inches: Tall. Better for taller lifters but can leave shorter athletes on their toes.
Proper foot placement during bench press requires your feet to be flat on the floor with your knees bent at roughly 90 degrees. If your bench is too tall, your feet slip and you lose leg drive. If it is too short, your hips rise off the pad. Competition bench height per IPF rules is 17 inches.
8. Overall Bench Weight
Heavier benches are generally more stable. A bench that weighs 65 to 75 lbs will not slide or tip during heavy use. A bench that weighs 30 to 40 lbs might shift on smooth flooring when you rack a heavy barbell.
However, bench weight also affects portability. If you train in a shared space and need to move the bench after every session, a 75 lb bench gets old fast. Foldable benches like the FLYBIRD address this by collapsing to a compact profile for storage, but they sacrifice some stability to achieve that portability.
If your bench has a permanent spot in your gym, prioritize weight and stability. If you need to store it after sessions, prioritize a foldable design with rubber feet to minimize sliding.
How to Test a Weight Bench Before Heavy Use
After your bench arrives, put it through these checks before loading it with serious weight:
- Wobble test. Place the bench on your gym floor and push it side to side from the pad. It should not rock or tip. If it wobbles, check that all bolts are fully tightened and that the floor is level.
- Pad compression test. Lie on the bench and have someone press a ruler against the pad beside your shoulder. Your body weight should compress the pad no more than a quarter to a half inch. More than that means the foam is too soft.
- Incline lock test. Set every incline position and push hard against the backrest. The locking pin or ladder mechanism should hold without slipping. If you hear clicking or feel movement, the locking mechanism is worn or poorly manufactured.
- Leg slide test. On incline, lie on the bench without bracing your feet on anything. Your body should not slide down the pad. If it does, the vinyl is too slick or the seat angle needs adjustment.
- Progressive load test. Start with just body weight, then add 135 lbs, then 185 lbs, then your working weight. Listen for creaking, popping, or metal-on-metal sounds at each stage. Any noise indicates a stress point that could fail under heavier loads.
Adjustable Bench Recommendations by Budget
Best Budget: FLYBIRD Adjustable Bench ($110)

FLYBIRD WB2 Weight Bench, Utility Adjustable Weight Bench
Capacity
800 lbs (ASTM Certified)
Steel
Commercial-Grade Steel Frame
Footprint
48.4" L x 16.5" W x 17" H (folded)
Price
$109.99
- 4.6+ star rating on Amazon with 25,000+ reviews
- Unbeatable value under $120
- ASTM-certified 800 lb weight capacity
- 8 backrest angles (90° to -30° FID)
- Folds flat for easy storage in small spaces
- Quick 10-minute assembly
- Gap between seat and backrest at steep inclines
- No decline position on some variants
- Pad is narrower (10.2") than premium benches (12")
- Feet can slide on smooth concrete without rubber mats
Price and availability may change
The FLYBIRD is the best-selling budget adjustable bench for good reason. It offers 8 backrest positions, 3 seat positions, folds flat for storage, and carries a claimed 800 lb weight capacity. For the price, it is remarkably functional.
The pad is 10.2 inches wide and uses medium-density foam that holds up well for lifters under 200 lbs. The folding mechanism is quick (about 10 seconds) and the bench stores at just 17 inches deep when collapsed. Build quality is 14-gauge steel with a powder-coat finish.
Where it falls short: The 10.2-inch pad width is narrow for larger lifters. There is a noticeable gap between the seat and backrest at incline angles above 45 degrees. The 800 lb rating is optimistic; treat it as a 500 to 600 lb bench for real-world safety margin. The vinyl pad cover can get slippery with sweat.
Best for: Budget-conscious lifters under 200 lbs who need a foldable bench for small spaces. Pairs well with a budget home gym build under $500.
Best All-in-One: Marcy Olympic Weight Bench ($240)
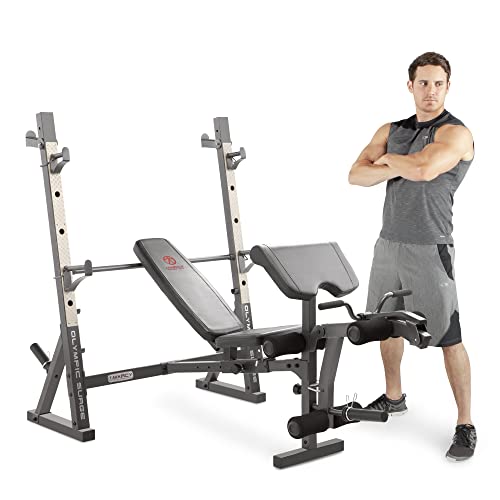
Marcy Olympic Workout Bench with Preacher Curl Pad and Weight Rack Storage
Capacity
300 lbs on-the-bar
Steel
14-Gauge Tubular Steel
Footprint
74" L x 49" W x 50" H
Price
$303.00
- 4.4+ star rating on Amazon with 4,000+ reviews
- Includes Olympic bar catches and uprights
- 4 bench positions: flat, incline, decline, upright
- Built-in arm curl pad and leg developer
- All-in-one home gym solution
- Great for lifters without a separate rack
- 300 lb on-the-bar limit restricts advanced lifters
- Upright posts are close-set — not full squat rack
- Heavy assembly (2+ hours)
- Leg developer pads can wear over time
Price and availability may change
The Marcy MD-857 combines an adjustable bench with integrated Olympic barbell uprights, a leg developer, and a preacher curl station. For lifters who do not own a separate power rack, this is a complete bench press station in one unit.
The uprights accept a standard 7-foot Olympic barbell and provide two height positions for bench press. The leg developer handles quad extensions and hamstring curls. The preacher curl pad is removable.
Where it falls short: The bar uprights limit you to roughly 300 lbs on the bar, which is restrictive for intermediate and advanced lifters. The bench angle adjustability is limited compared to dedicated adjustable benches. Once you outgrow the 300 lb limit, you need a power rack anyway, making the integrated uprights dead weight.
Best for: True beginners who want an all-in-one starter setup for under $250 and do not plan to lift more than 300 lbs in the near term.
Weight Bench Maintenance and Longevity
A quality bench should last 10 to 20 years with minimal care. Here is how to keep it in top condition:
Monthly maintenance:
- Wipe down the pad with a damp cloth and mild soap to remove sweat, chalk, and body oils. Accumulated sweat degrades vinyl over time and creates a slippery surface.
- Check all bolts and tighten any that have loosened. Adjustment mechanisms and frame joints are the most common locations for loosening.
- Inspect the locking pins and pop-pin mechanisms. Clean any debris from the adjustment holes.
Quarterly maintenance:
- Apply a small amount of silicone spray to adjustment ladder teeth and hinge points to prevent squeaking and ensure smooth operation.
- Inspect the vinyl pad for cracks, tears, or delamination. Small tears can be repaired with vinyl patch kits. Large tears mean the pad needs replacement.
- Check rubber feet for wear and replace any that have flattened or fallen off.
Long-term considerations:
- Foam pads compress over time with heavy use. If your pad has compressed more than half an inch from its original thickness, consider replacing the pad or the entire bench.
- Powder-coat finishes on the frame can chip and rust in humid garage environments. Touch up chips with rust-inhibiting spray paint.
- If your bench develops a persistent wobble that tightening bolts does not fix, a joint has likely worn out. This typically happens after 5 to 8 years of heavy use on budget benches.
For more on keeping all your equipment in top shape, see our guide to cleaning gym equipment.
Training Tips: Getting the Most From Your Bench
Owning a good bench is only half the equation. Here is how to use it effectively.
Bench Press Setup (The Big Three Cues)
- Retract and depress your scapulae. Pull your shoulder blades together and down toward your back pockets. This creates a stable shelf on the bench and protects your shoulders. If the bench pad is too narrow to support this position, the pad is too narrow.
- Arch your upper back. A natural arch in your thoracic spine is not dangerous. It shortens the range of motion, puts your shoulders in a safer position, and lets you press more weight. Your glutes stay on the bench.
- Drive your feet into the floor. Leg drive is not cheating. It transfers force through your body into the bench and stabilizes your entire pressing platform. This is where bench height matters. Your feet should be flat with knees bent at 80 to 90 degrees.
Incline Angles for Muscle Targeting
Different incline angles shift emphasis between the clavicular (upper) and sternal (lower) portions of the pectorals:
- Flat (0 degrees): Maximum overall chest activation. Sternal head dominant.
- 15 degrees: Slight upper chest emphasis with minimal shoulder takeover. Many coaches consider this the most effective incline angle for chest development.
- 30 degrees: Traditional low incline. Good balance of upper chest and front deltoid.
- 45 degrees: Significant front deltoid involvement. Still hits upper chest but the shoulders do more work.
- 60+ degrees: Essentially a shoulder press. Minimal chest activation.
If your bench only offers 0, 30, and 45 degrees (common on budget models), the 30-degree position is your best incline option for chest development.
Movements Beyond Pressing
A good adjustable bench supports far more than bench press and incline press:
- Chest-supported dumbbell rows: Set the bench to 30 to 45 degrees, lie face down, and row. Eliminates lower back fatigue and isolates the lats.
- Hip thrusts: Position your upper back on the bench, feet on the floor, and drive your hips up with a loaded barbell across your lap. The bench height of 17 inches is ideal for this movement.
- Bulgarian split squats: Place your rear foot on the bench behind you and lunge. One of the best single-leg exercises for quad and glute development.
- Seated dumbbell overhead press: Set the bench to 85 degrees (near vertical) for supported overhead pressing. Reduces lower back stress compared to standing press.
- Step-ups: Use the bench as a platform for weighted step-ups. At 17 inches, it provides a challenging height for most lifters.
- Dumbbell pullovers: Lie across the bench perpendicular to the pad and perform pullovers for chest and lat development.
Safety Considerations
Weight bench accidents are rare but serious. Follow these guidelines:
- Never bench press heavy weight alone without safety bars. A power rack with adjustable safety bars or safety straps is the correct setup. An Olympic weight bench with integrated uprights is acceptable but less safe than a full rack. Never bench heavy with no safety mechanism at all.
- Do not exceed the real-world capacity of your bench. If your bench is rated for 600 lbs, treat 400 lbs as your practical ceiling to maintain a safety margin for dynamic forces.
- Inspect before every session. Give the bench a quick shake before lying down. If it wobbles, something has loosened. Fix it before loading weight.
- Position the bench correctly in your rack. The barbell should be directly over your eyes when you lie down. The J-cups should be set so you can unrack with only a slight elbow bend. Too high and you lose shoulder position reaching for the bar. Too low and you waste energy pressing the bar out of the hooks.
- Use a non-slip surface. Place the bench on rubber gym flooring, not bare concrete or tile. The rubber prevents the bench from sliding during heavy pressing. Check out our gym flooring guide for options.
Common Questions
Do I need an adjustable bench or is a flat bench enough?
What weight capacity do I actually need?
How important is pad width for bench pressing?
What is zero-gap design and is it worth paying extra for?
Can I use a weight bench for squats?
Is a foldable bench stable enough for serious lifting?
Should I buy an Olympic weight bench or a separate bench and power rack?
How long should a good weight bench last?
Additional Resources
- CPSC Fitness Equipment Safety Guide
- ASTM Fitness Equipment Safety Standards
- ACE Equipment Selection Guide
Related Content
- Best Weight Benches for Home Gyms
- Best Weight Benches Under $300
- FLYBIRD vs Marcy Bench Comparison
- How to Choose a Power Rack
- How to Choose Adjustable Dumbbells
- Home Gym Under $500
- Home Gym Under $1,000
- How to Build a Garage Gym
The Bottom Line
For most home gym owners, an adjustable flat-incline bench in the $100 to $300 range is the right purchase. Prioritize weight capacity (700 lbs minimum), pad width (11 inches or wider), and build quality (12-gauge steel or better) over flashy features. The FLYBIRD Adjustable Bench at $110 remains the best value pick for budget-conscious lifters who need foldable storage. The Marcy Olympic Weight Bench at $240 is the right choice for beginners who need a complete bench press station without a separate rack.
If your budget allows $300 to $500, step up to a bench with zero-gap design, 12-inch pad width, and 1,000+ lb capacity from brands like REP Fitness or Titan Fitness. That bench will serve you for a decade of serious training without a single complaint. Whatever you choose, pair it with a solid power rack and a quality barbell, and you have the foundation for a garage gym that handles anything you throw at it.
Marcus Reid
Powerlifter and mechanical engineer who has been building and breaking home gym equipment for 15 years.
Read full bioMore in Guides
Strength vs Hypertrophy: How to Program for Your Goals (2026)
The definitive guide to programming for strength vs size in your home gym. Rep ranges, volume, intensity, and complete programs for both goals.
The Complete Home Gym Warm-Up Guide (2026)
Stop skipping your warm-up. Complete warm-up protocols for every training style, plus the equipment that makes preparation effortless at home.
Home Gym Deload Guide: When and How to Back Off (2026)
Learn when and how to deload in your home gym. Science-backed protocols, recovery strategies, and signs you need a rest week.